Updated 4/10/16, for version 11 of
TeamViewer.
Here’s how to use Teamviewer for SOM baseball.
One point of clarification: In this explanation, the word “meeting” refers to the computer “sharing” session you’re going to host.
1. Start the SOM baseball software. Resize the window so that it takes up the left three-quarters of the screen. You can change the size of the window by clicking-and-dragging the lower right corner of the SOM baseball window. (We’re doing this now, so that the Teamviewer panel doesn’t cover up SOM baseball.)
2. Start Teamviewer and click on the computer monitor icon at the far left, under the “Host Meeting” section.

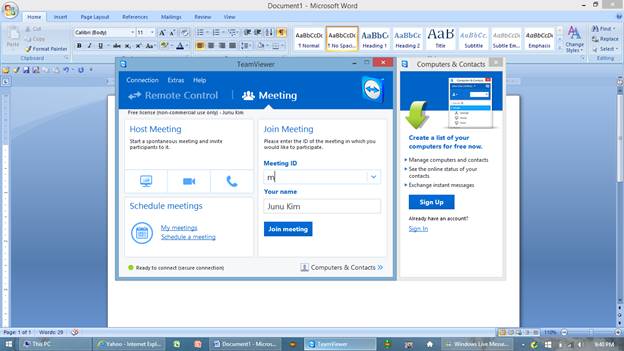
This is the
“computer monitor” icon that you should click on, to start the meeting.
3. Once you click on this icon, your meeting will start. You’ll know your meeting is live when you see the Teamviewer panel at the right.
For maximum convenience – and to prevent your Teamviewer panel from obscuring whatever appears underneath it – drag the Teamviewer panel so that the top right corner is flush with the top right corner of your monitor. If you do this, your screen will look like what appears below. Tinker with the size of the SOM baseball window, so that it’s not covered up by the Teamviewer panel.

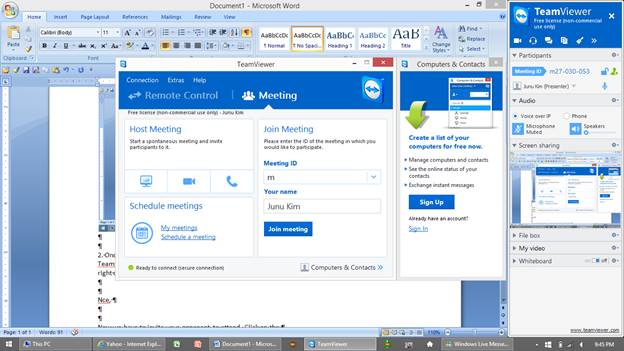
After you drag and
move the Teamviewer panel to the top right, you’ll
notice how the panel takes up the far right of the screen – and notice how SOM
baseball is flush against this window.
4. If your computer and your opponent’s computer will support voice or video, activate either the voice option or the video option.
Click the camera to activate a video connection … and the headphones to activate an audio connection.

![]()
5. Invite your opponent. Take note of the meeting number, which is at the top right, next to the blue arrow that says “Meeting ID.”
Then, write an email to your opponent to let him know how to reach your meeting. Feel free to copy-and-paste the bold italicized text below into the email – but BE SURE TO CHANGE THE MEETING NUMBER FOR THE BLANK BELOW, IN STEP 1: add the 8 numbers of your meeting ID, but omit the dashes. For example, if it’s meeting ID m27-030-053, you would put this in the blank: 27030053
Here’s how to join my meeting and see my
computer monitor.
(1) Click this link (or copy and paste this
address into a browser window): http://go.teamviewer.com/v11/m__________
(2) Do one of these two things:
(a) Download the Teamviewer
software and log in to the meeting number shown above
(b) Cancel any requests to download/install
software. Instead, on the Webpage that comes up, look on the left side of the
screen for the link that says "Alternative Access - Join using the browser
version" and click on that link. This should let you see what’s on my
screen.
(3) To personalize your name:
(a) Look in the Teamviewer
toolbar (at the top of the screen, on the browser version) for the icon with
the head-and-shoulders outline. This is the link to show what participants are
online. Click this icon.
(b) You will appear as "Participant
__" with the blank filled in with a number.
(c) Edit your name by clicking the pencil
icon to the right of the participant that you are (you should only have the
option to edit one participant; obviously, that'll be you :-)
). Hit the enter key on your keyboard to save the change.
(4) To activate the chat box: Look in the Teamviewer toolbar for the quote-bubble icon. This
activates the chat box; click this link.
At this point, we should talk <<STATE
WHETHER YOU’LL TALK BY PHONE OR VIA THE AUDIO OR VIDEO CONNECTION IN
TEAMVIEWER>> since it’ll be faster to communicate that way instead of by
using the chat box.
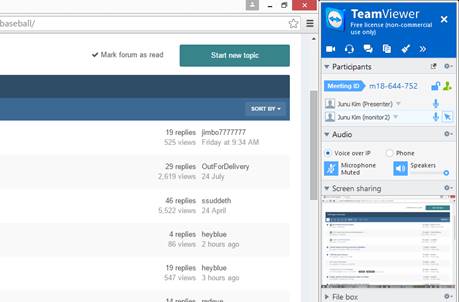
6. Want to give your opponent the chance to run your computer, so that he can make whatever lineup changes he wants, instead of giving your verbal or written directions)? Here’s what to do.
 Look
in the Teamviewer box. To the far right of your
opponent’s name, you’ll see an arrow icon in a square with a slash over it. If
this slash is shown, that means that this visitor cannot control your computer.
Look
in the Teamviewer box. To the far right of your
opponent’s name, you’ll see an arrow icon in a square with a slash over it. If
this slash is shown, that means that this visitor cannot control your computer.
![]()
 Click
on that box, and the slash is gone. At this point, your opponent can move your
mouse – though you also have control
simultaneously.
Click
on that box, and the slash is gone. At this point, your opponent can move your
mouse – though you also have control
simultaneously.
![]()
To prevent your opponent from controlling your computer, simply click that arrow-in-the-square again, so that the arrow has a slash on it.